9. Templates
“Django’s template language is designed to strike a balance between power and ease. It’s designed to feel comfortable to those used to working with HTML. If you have any exposure to other text-based template languages, such as Smarty or Jinja2, you should feel right at home with Django’s templates.”
To view the contents, which are generated by the views we just created, we now need to prepare the templates.
9.1. The Django template system
Django has it’s own template system to create HTML which doesn’t simply mix up Python code and HTML. This is done for a reason: The template system should be used to display the contents and not for programming logic.
The Django template system provides various tags to perform simple operations. For example can the if tag be used to execute various tests or the for tag to iterate over a list. However the templates are not executed like regular Python code and the choice of functions is limited to the tags and filters provided by the Django template system. But it is possible to extend the template system with your own tags and filters.
Aside from that the Django template system has a powerful inheritance feature. With this feature it’s possible to use a base template that contains all basic elements of the website and defines different blocks. Some or all of these blocks can be overwritten or extended by child templates which extend the base template. Those who are familiar with object orientated programming know this pattern.
9.2. Create the base template
At first create the base template with the help of the HTML5 Boilerplate. It comes together with Bootstrap 3, a popular HTML and CSS framework for developing responsive, mobile first websites and jQuery, a fast, small, and feature-rich JavaScript library. Perform the following steps to download and copy the files:
- Click at the Initializr Website on “Bootstrap”
- In the section “H5BP Optional” check the “404 Page” option
- Finally click on the button “Download it!”
- Extract the ZIP archive
- Copy the file
index.htmlinto the directorymysite/templatesand rename it tobase.html - Copy the file
404.htmlinto the same directory - Copy the directories
css,imgandjsand the fileapple-touch-icon.pnginto the directorymysite/static
Note
To make the download of the HTML5 Boilerplate ZIP archive work your browser needs to accept the cookies set by the website.
Now you need to adjust the base template base.html so that Django is
able to able to use the right path for the static files. Therefor you will use
the static template tag from
the staticfiles app. Template tags are written this way: {% tag %}. Because
the tag static is provided by an app it’s not part of the default template
tags and needs to be loaded first. This is done with the help of the
load tag at the top of the
template. Customize all highlighted parts in the head of base.html as
shown:
1 2 3 4 5 6 7 8 9 10 11 12 13 14 15 16 17 18 19 20 21 22 23 24 25 26 27 | {% load staticfiles %}
<!doctype html>
<!--[if lt IE 7]> <html class="no-js lt-ie9 lt-ie8 lt-ie7" lang=""> <![endif]-->
<!--[if IE 7]> <html class="no-js lt-ie9 lt-ie8" lang=""> <![endif]-->
<!--[if IE 8]> <html class="no-js lt-ie9" lang=""> <![endif]-->
<!--[if gt IE 8]><!--> <html class="no-js" lang=""> <!--<![endif]-->
<head>
<meta charset="utf-8">
<meta http-equiv="X-UA-Compatible" content="IE=edge,chrome=1">
<title></title>
<meta name="description" content="">
<meta name="viewport" content="width=device-width, initial-scale=1">
<link rel="apple-touch-icon" href="{% static "apple-touch-icon.png" %}">
<link rel="stylesheet" href="{% static "css/bootstrap.min.css" %}">
<style>
body {
padding-top: 50px;
padding-bottom: 20px;
}
</style>
<link rel="stylesheet" href="{% static "css/bootstrap-theme.min.css" %}">
<link rel="stylesheet" href="{% static "css/main.css" %}">
<script src="{% static "js/vendor/modernizr-2.8.3-respond-1.4.2.min.js" %}"></script>
</head>
<body>
|
Now follow the locations where the static tag needs to be placed at
the end of the template base.html:
87 88 89 90 91 92 93 94 95 96 97 98 99 100 101 102 103 104 105 106 107 | <footer>
<p>© Company 2015</p>
</footer>
</div> <!-- /container --> <script src="//ajax.googleapis.com/ajax/libs/jquery/1.11.2/jquery.min.js"></script>
<script>window.jQuery || document.write('<script src="{% static "js/vendor/jquery-1.11.2.min.js" %}"><\/script>')</script>
<script src="{% static "js/vendor/bootstrap.min.js" %}"></script>
<script src="{% static "js/main.js" %}"></script>
<!-- Google Analytics: change UA-XXXXX-X to be your site's ID. -->
<script>
(function(b,o,i,l,e,r){b.GoogleAnalyticsObject=l;b[l]||(b[l]=
function(){(b[l].q=b[l].q||[]).push(arguments)});b[l].l=+new Date;
e=o.createElement(i);r=o.getElementsByTagName(i)[0];
e.src='//www.google-analytics.com/analytics.js';
r.parentNode.insertBefore(e,r)}(window,document,'script','ga'));
ga('create','UA-XXXXX-X','auto');ga('send','pageview');
</script>
</body>
</html>
|
Now replace the title HTML tag with the highlighted line:
7 8 9 10 11 12 | <head>
<meta charset="utf-8">
<meta http-equiv="X-UA-Compatible" content="IE=edge,chrome=1">
<title>Marcador - {% block title %}{% endblock %}</title>
<meta name="description" content="">
<meta name="viewport" content="width=device-width, initial-scale=1">
|
Here, the first (empty) block will be defined with the help of the block tag.
Delete the <div> HTML tag overwritten with <!-- Main jumbotron for a
primary marketing message or call to action --> including it’s contents. Here
can see the lines you have to delete:
56 57 58 59 60 61 62 63 | <!-- Main jumbotron for a primary marketing message or call to action -->
<div class="jumbotron">
<div class="container">
<h1>Hello, world!</h1>
<p>This is a template for a simple marketing or informational website. It includes a large callout called a jumbotron and three supporting pieces of content. Use it as a starting point to create something more unique.</p>
<p><a class="btn btn-primary btn-lg" href="#" role="button">Learn more »</a></p>
</div>
</div>
|
Below you will see another <div> HTML tag follow by <!-- Example row of
columns -->. Delete the HTML comment and the following HTML tag <div
class="row"> including it’s contents. Here can see the lines you have to
delete:
66 67 68 69 70 71 72 73 74 75 76 77 78 79 80 81 82 83 | <!-- Example row of columns -->
<div
class="row">
<div class="col-md-4">
<h2>Heading</h2>
<p>Donec id elit non mi porta gravida at eget metus. Fusce dapibus, tellus ac cursus commodo, tortor mauris condimentum nibh, ut fermentum massa justo sit amet risus. Etiam porta sem malesuada magna mollis euismod. Donec sed odio dui. </p>
<p><a class="btn btn-default" href="#" role="button">View details »</a></p>
</div>
<div class="col-md-4">
<h2>Heading</h2>
<p>Donec sed odio dui. Cras justo odio, dapibus ac facilisis in, egestas eget quam. Vestibulum id ligula porta felis euismod semper. Fusce dapibus, tellus ac cursus commodo, tortor mauris condimentum nibh, ut fermentum massa justo sit amet risus.</p>
<p><a class="btn btn-default" href="#" role="button">View details »</a></p>
</div>
</div>
|
Now add two additional blocks to the remaining <div> HTML tag; one for the
headline and the other for the contents of the current page:
50 51 52 53 54 55 56 57 58 59 60 61 62 63 | <div class="container">
<div>
{% block heading %}{% endblock %}
</div>
<div>
{% block content %}{% endblock %}
</div>
<hr>
<footer>
<p>© Company 2015</p>
</footer>
</div> <!-- /container --> <script src="//ajax.googleapis.com/ajax/libs/jquery/1.11.2/jquery.min.js"></script>
|
That’s it! The base template is done!
9.3. Create the templates for the views
Now the base template is finished. The next step is to create the missing templates for the views. First create the appropriate directory structure:
$ mkdir -p marcador/templates/marcador
This structure is necessary so that the template loader can load the
templates. After that the app marcador has this structure:
marcador
|-- __init__.py
|-- admin.py
|-- migrations
|   |-- 0001_initial.py
|   `-- __init__.py
|-- models.py
|-- templates
|   `-- marcador
|-- tests.py
|-- urls.py
`-- views.py
Note
If the development server was running while creating the new directories you have to restart it. Otherwise the new directories wouldn’t be recognized.
Now create the templates inside the directory
marcador/templates/marcador.
At first the template for the list view bookmark_list.html:
1 2 3 4 5 6 7 8 9 10 11 12 13 14 15 16 17 | {% extends "base.html" %}
{% block title %}Latest bookmarks{% endblock %}
{% block heading %}
<h2>Latest bookmarks</h2>
{% endblock %}
{% block content %}
<ul class="list-unstyled">
{% for bookmark in bookmarks %}
<li class="well well-sm">{% include "marcador/bookmark.html" %}</li>
{% empty %}
<li>No bookmarks. :(</li>
{% endfor %}
</ul>
{% endblock %}
|
This template extends the base template base.html with the help
of the extends tag.
Therefor it’s possible to extend the blocks defined inside the base
template. Besides the already mentioned for tag is used to iterate
over the list of bookmarks (bookmarks) and create a list entry for
each. The template for the bookmark is included using the
include tag.
Now you create the template bookmark.html which has been
included in the previous template using the include tag:
1 2 3 4 5 6 7 8 9 10 11 12 13 14 15 16 17 | <a class="lead" href="{{ bookmark.url }}">{{ bookmark.title }}</a>
{% if bookmark.description %}
<br>{{ bookmark.description|linebreaksbr }}
{% endif %}
{% if not bookmark.is_public %}
<br><span class="label label-warning">private</span>
{% else %}
<br>
{% endif %}
{% if bookmark.tags.count %}
{% for tag in bookmark.tags.all %}
<span class="label label-primary">{{ tag|lower }}</span>
{% endfor %}
{% endif %}
<br>by <a href="{% url "marcador_bookmark_user" bookmark.owner.username %}">
{{ bookmark.owner.username }}</a>
{{ bookmark.date_created|timesince }} ago
|
In this template a Bookmark object is available which is bound to
the bookmark variable. In a template it’s possible to access the
attributes of an object, for example the title by using
bookmark.title. The attributes can be modified by filters, for
example by using linebreaksbr which converts all <br />
HTML tags to real line breaks.
It is also possible to access related objects, for example the tags.
Because bookmark.tags is a list of objects represented by a
manager object you can access the Tag objects only
with the help of methods defined by the manager. bookmark.tags.count
returns the number of tags. bookmark.tags.all creates an iterator
which can be used in a loop. To call these methods in your Python code
you have to put a pair of brackets at the end of the method
(bookmark.tags.count()). If the methods are called in a template no
brackets are allowed because you can’t pass arguments to a method in a
template.
With the help of the url tag
a link to the bookmark owners other bookmarks is created at the end of
the template. Because the URL marcador_bookmark_user needs a user
name we need to pass it as an argument to the template tag. That implies
arguments can be passed to template tags.
At last the template for the user’s bookmarks must be created,
bookmark_user.html:
1 2 3 4 5 6 7 8 9 | {% extends "marcador/bookmark_list.html" %}
{% block title %}{{ owner.username }}'s bookmarks{% endblock %}
{% block heading %}
<h2>{{ owner.username }}'s bookmarks<br>
<small>{{ bookmarks.count }} bookmarks in total</small>
</h2>
{% endblock %}
|
This template extends the template bookmark_list.html because
there are only very small differences between them. We need only to
overwrite the blocks title and heading and can reuse the rest.
Very convenient!
9.4. Test the new templates
After all templates have been created you can start the development server and have a look at the bookmarks, which you have created using the admin, at the front end under http://127.0.0.1:8000/.
The list of bookmarks should look like this:
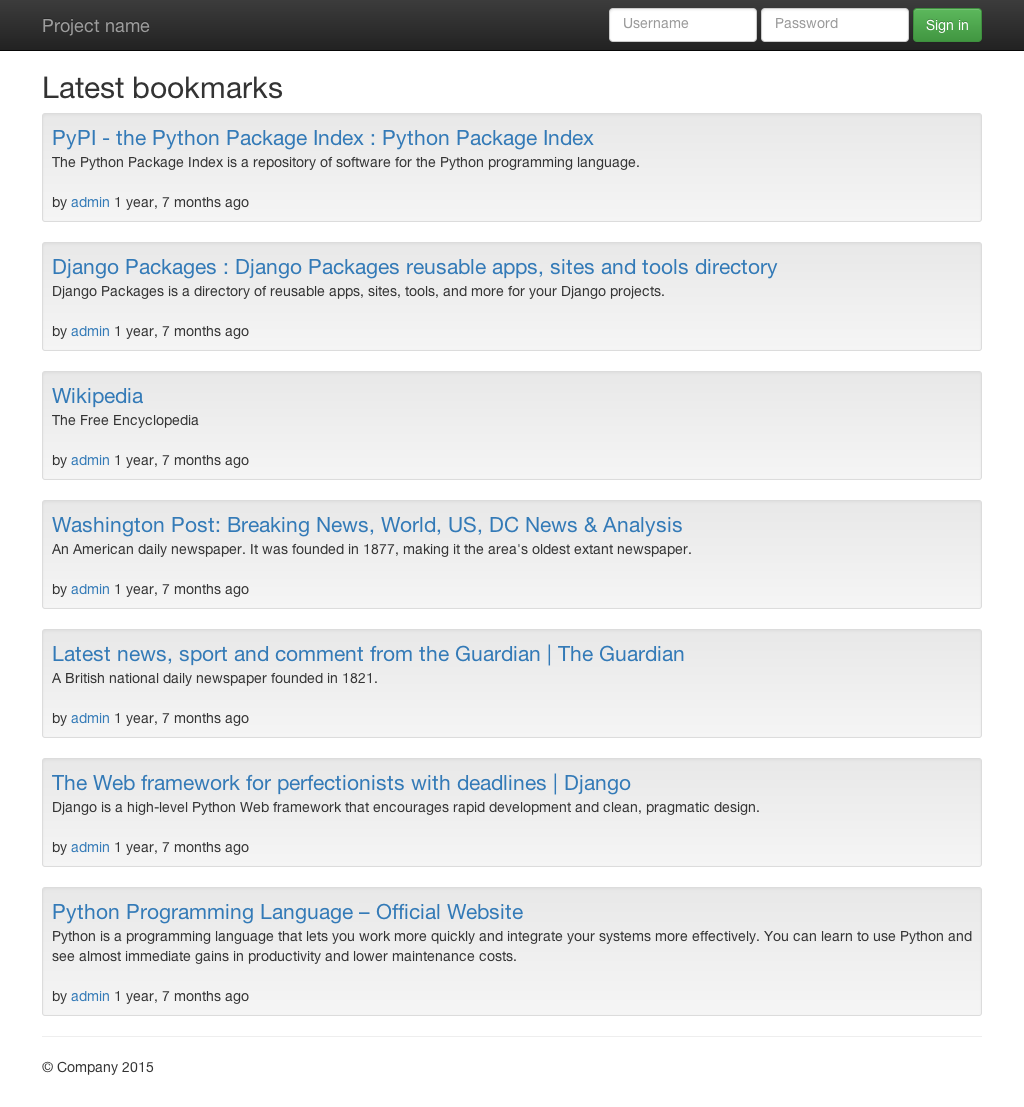
The login form at the top of the page does not work yet. But you will finish it right in the next chapter!